 Latest images
KyLie's Tutorial - KLUB Dezines
Page 1 of 1

KyLie's Tutorial - KLUB Dezines
![]() by KyLie Sun Apr 11, 2010 9:21 am
by KyLie Sun Apr 11, 2010 9:21 am
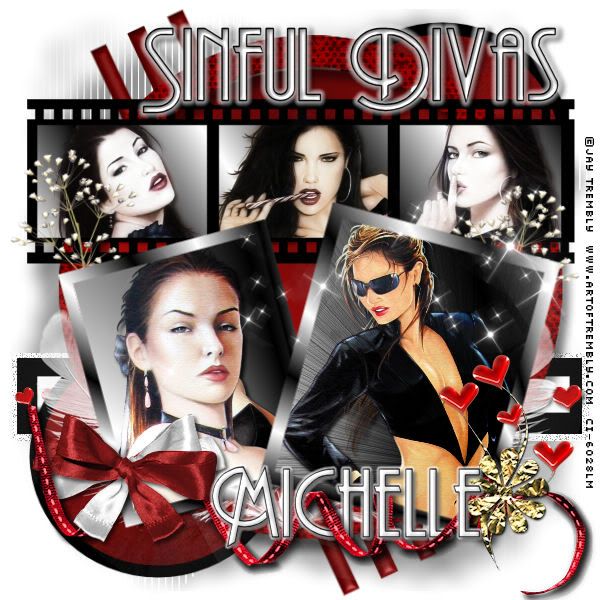
SINFUL DIVAS
You must have a working knowledge of PSP
I am using the awesome artwork of Jay Trembly
You must purchase a license to use his art
You can buy from CILM
Supplies needed:
KLUB Dezines Template. HERE
FTU kit called "Our Love" from Jaelop Designs.
Thanks Jael for sharing your beautiful kit. HERE
Be sure to leave some love when you download.
My Supply: HERE
5 tubes of choice
Plugins: Eye Candy 4000 (Gradient Glow)
PSP Effects: Illumination Effects: Sunburst
Font used: Andes

Let's Begin
1
Open KLUB Dezines Template in psp
I will be working with this template size: 600 x 600 pixels
Unhide the background so it's easier to work with a white background
Delete the copyright
2
Copy and paste element 2 (red frame) as a new layer. Resize by 53%
Place it above the Big Circle
3
Highlight Twin Circles
Selections / Select all / Float / Defloat
Copy and paste your paper of choice as a new layer
I used paper 8. Resize by 600 x 600 pixels
Selections / invert / hit delete on keyboard. Select none
4
Highlight Film Strip
Selections / Select all / Float / Defloat
Copy and paste your lst tube of choice as a new layer
Selections / invert / hit delete on keyboard.
Copy and paste your 2nd of choice. Hit delete on keyboard
Copy and paste your 3rd tube of choice. Hit delete on keyboard
When you have finished with all the 3 tubes
Select none
Merge all the 3 tubes. Duplicate
On the Duplicate. Adjust / Blur / Gaussian Blue: Radius 4
Change blend mode to Overlay. Opacity: 75%
On the Original, change blend mode to Luminance (L)
5
Highlight L-Square
Selections / Select all / Float / Defloat
Copy and paste your 4th tube of choice as a new layer
Selections / invert / hit delete on keyboard. Select none.
Change blend mode to Hard Light
Repeat the same for R-Square for your 5th tube of choice
Highlight R-Square again...
Effects / Illumination Effects / Sunburst
Follow my settings as below
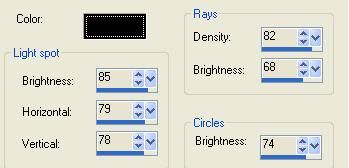
Click OK
6
Copy and paste element 13 (feathers) as a new layer.
Resize by 31%. Place them behind the Squares
7
Copy and paste element 35 as a new layer. Resize by 22%
Place it on the left of the Film Strip.
Image / Free Rotate / Left 10
Duplicate / Mirror
Erase the unwanted bottom parts of the stems
8
Copy and paste element 17 (ribbon) as a new layer. Resize by 20%
Place it below the Square frames
9
Copy and paste element 19 as a new layer. Resize by 15%
Place it on the right of the R-Square frame
10
Copy and paste element 6 as a new layer. Resize by 15%
Place it on top of element 19
11
Highlight your WordArt
Effects / 3D Effects - Inner Bevel
Follow my settings as below
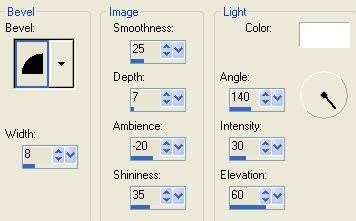
Click OK
Effects - Eye Candy 4000 - Gradient Glow
Follow my settings as below
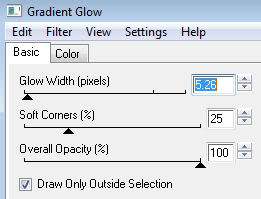
Click OK
12
Copy and paste other elements of choice.
I have also used the following:-
element 33 and element 34. Resize by 20%
element 10: Resize by 16%
Place them as desired...
See my finished tag for reference!!!
13
Open the sparkle included in my supply
Copy and paste the sparkle as a new layer
Place it on the right
14
For the Drop Shadow
I used the following settings:
V and H 3, Opacity 60 Blur 5.00 Color: Black
15
Add your name, artist's copyright and URL
Save as a .png or jpeg
You're Done!!!
Thank you for trying this tutorial.
Any similarities to other tutorials is merely a coincidence
This tutorial was written by KyLie on 10th April 2010
You must have a working knowledge of PSP
I am using the awesome artwork of Jay Trembly
You must purchase a license to use his art
You can buy from CILM
Supplies needed:
KLUB Dezines Template. HERE
FTU kit called "Our Love" from Jaelop Designs.
Thanks Jael for sharing your beautiful kit. HERE
Be sure to leave some love when you download.
My Supply: HERE
5 tubes of choice
Plugins: Eye Candy 4000 (Gradient Glow)
PSP Effects: Illumination Effects: Sunburst
Font used: Andes
Let's Begin
1
Open KLUB Dezines Template in psp
I will be working with this template size: 600 x 600 pixels
Unhide the background so it's easier to work with a white background
Delete the copyright
2
Copy and paste element 2 (red frame) as a new layer. Resize by 53%
Place it above the Big Circle
3
Highlight Twin Circles
Selections / Select all / Float / Defloat
Copy and paste your paper of choice as a new layer
I used paper 8. Resize by 600 x 600 pixels
Selections / invert / hit delete on keyboard. Select none
4
Highlight Film Strip
Selections / Select all / Float / Defloat
Copy and paste your lst tube of choice as a new layer
Selections / invert / hit delete on keyboard.
Copy and paste your 2nd of choice. Hit delete on keyboard
Copy and paste your 3rd tube of choice. Hit delete on keyboard
When you have finished with all the 3 tubes
Select none
Merge all the 3 tubes. Duplicate
On the Duplicate. Adjust / Blur / Gaussian Blue: Radius 4
Change blend mode to Overlay. Opacity: 75%
On the Original, change blend mode to Luminance (L)
5
Highlight L-Square
Selections / Select all / Float / Defloat
Copy and paste your 4th tube of choice as a new layer
Selections / invert / hit delete on keyboard. Select none.
Change blend mode to Hard Light
Repeat the same for R-Square for your 5th tube of choice
Highlight R-Square again...
Effects / Illumination Effects / Sunburst
Follow my settings as below
Click OK
6
Copy and paste element 13 (feathers) as a new layer.
Resize by 31%. Place them behind the Squares
7
Copy and paste element 35 as a new layer. Resize by 22%
Place it on the left of the Film Strip.
Image / Free Rotate / Left 10
Duplicate / Mirror
Erase the unwanted bottom parts of the stems
8
Copy and paste element 17 (ribbon) as a new layer. Resize by 20%
Place it below the Square frames
9
Copy and paste element 19 as a new layer. Resize by 15%
Place it on the right of the R-Square frame
10
Copy and paste element 6 as a new layer. Resize by 15%
Place it on top of element 19
11
Highlight your WordArt
Effects / 3D Effects - Inner Bevel
Follow my settings as below
Click OK
Effects - Eye Candy 4000 - Gradient Glow
Follow my settings as below
Click OK
12
Copy and paste other elements of choice.
I have also used the following:-
element 33 and element 34. Resize by 20%
element 10: Resize by 16%
Place them as desired...
See my finished tag for reference!!!
13
Open the sparkle included in my supply
Copy and paste the sparkle as a new layer
Place it on the right
14
For the Drop Shadow
I used the following settings:
V and H 3, Opacity 60 Blur 5.00 Color: Black
15
Add your name, artist's copyright and URL
Save as a .png or jpeg
You're Done!!!
Thank you for trying this tutorial.
Any similarities to other tutorials is merely a coincidence
This tutorial was written by KyLie on 10th April 2010

KyLie- Sinful Diva-Licious

- Posts : 1321
Join date : 2009-09-18
Location : Germany
Page 1 of 1
Permissions in this forum:
You cannot reply to topics in this forum|
|
|